> ## Documentation Index
> Fetch the complete documentation index at: https://docs.salesvoicesai.com/llms.txt
> Use this file to discover all available pages before exploring further.
# White Label Setup
> Step-by-step guide for setting up your white labeled platform
Follow these steps to configure your white label platform:
## 1. Activate White Label
1. Purchase the white label plan
2. Wait for activation confirmation
3. Access your dashboard
## 2. Access Administration Panel
1. Look for the "Administration Panel" button in your dashboard
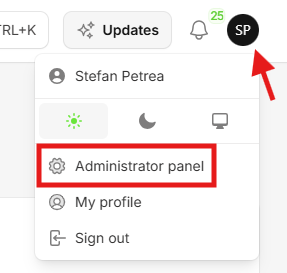 2. Click to access administration settings
## 3. Configure Platform Settings
Navigate to your Administration Panel settings page to customize your platform. Each configuration section controls different aspects of your branded platform:
### Brand Identity Configuration
2. Click to access administration settings
## 3. Configure Platform Settings
Navigate to your Administration Panel settings page to customize your platform. Each configuration section controls different aspects of your branded platform:
### Brand Identity Configuration
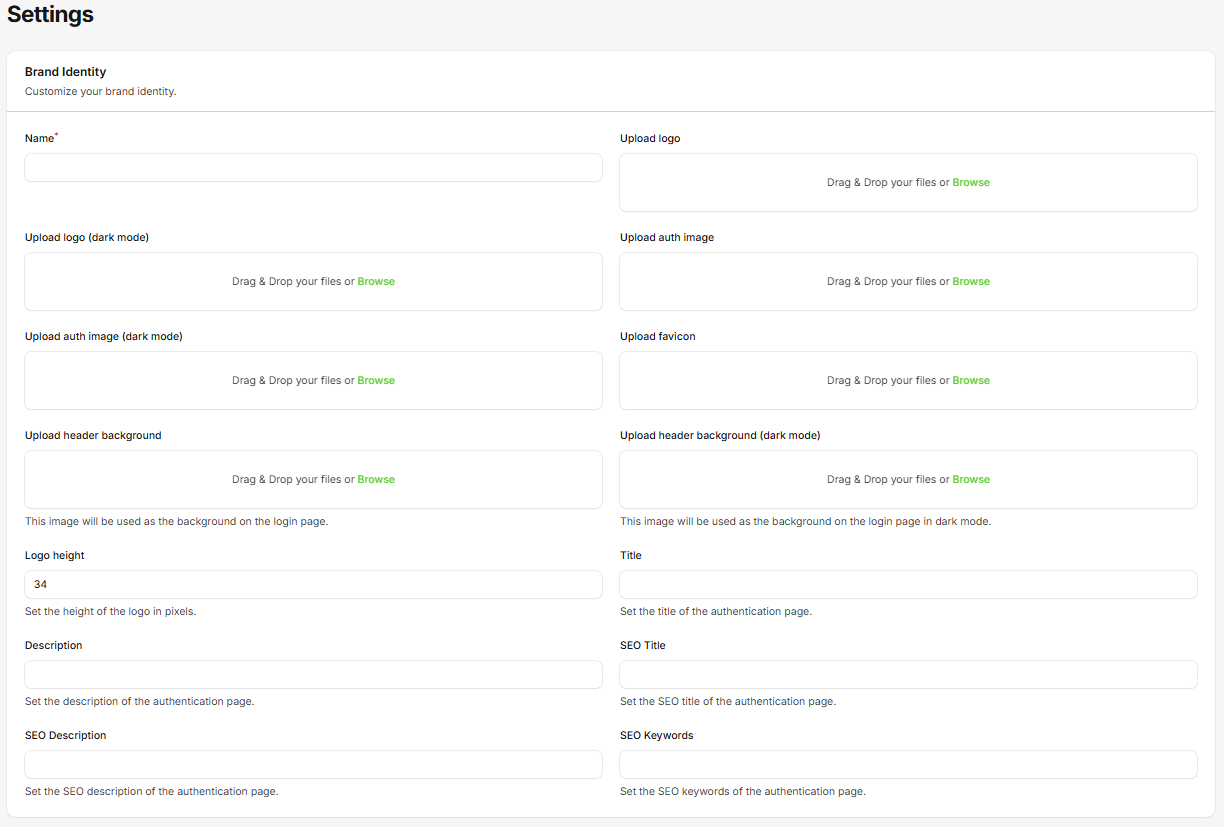 **Complete Branding Setup:**
* **Platform Name:** Company name displayed throughout the interface and emails
* **Main Logo:** Primary logo for dashboard header and user interface (light mode)
* **Dark Mode Logo:** Alternative logo for dark theme compatibility
* **Auth Page Image:** Custom image for login/registration pages (light mode)
* **Auth Page Image (Dark):** Alternative auth image for dark theme
* **Favicon:** Browser tab icon (.ico or .png format)
* **Header Background:** Login page background image (light mode)
* **Header Background (Dark):** Login page background for dark theme
* **Logo Height:** Custom logo height in pixels (default: 35px)
* **Page Title:** Authentication page headline text
* **Page Description:** Authentication page subtitle/description
* **SEO Title:** Browser title and search engine optimization
* **SEO Description:** Meta description for search engines
* **SEO Keywords:** Meta keywords for search optimization
**Image Requirements:**
* Logo: PNG/SVG recommended, transparent background
* Auth Images: High resolution JPEG/PNG/WebP (1920x1080 recommended)
* Favicon: 32x32 or 16x16 pixels
* Header Backgrounds: 1920x1080 minimum resolution
### Custom Domain Setup
**Complete Branding Setup:**
* **Platform Name:** Company name displayed throughout the interface and emails
* **Main Logo:** Primary logo for dashboard header and user interface (light mode)
* **Dark Mode Logo:** Alternative logo for dark theme compatibility
* **Auth Page Image:** Custom image for login/registration pages (light mode)
* **Auth Page Image (Dark):** Alternative auth image for dark theme
* **Favicon:** Browser tab icon (.ico or .png format)
* **Header Background:** Login page background image (light mode)
* **Header Background (Dark):** Login page background for dark theme
* **Logo Height:** Custom logo height in pixels (default: 35px)
* **Page Title:** Authentication page headline text
* **Page Description:** Authentication page subtitle/description
* **SEO Title:** Browser title and search engine optimization
* **SEO Description:** Meta description for search engines
* **SEO Keywords:** Meta keywords for search optimization
**Image Requirements:**
* Logo: PNG/SVG recommended, transparent background
* Auth Images: High resolution JPEG/PNG/WebP (1920x1080 recommended)
* Favicon: 32x32 or 16x16 pixels
* Header Backgrounds: 1920x1080 minimum resolution
### Custom Domain Setup
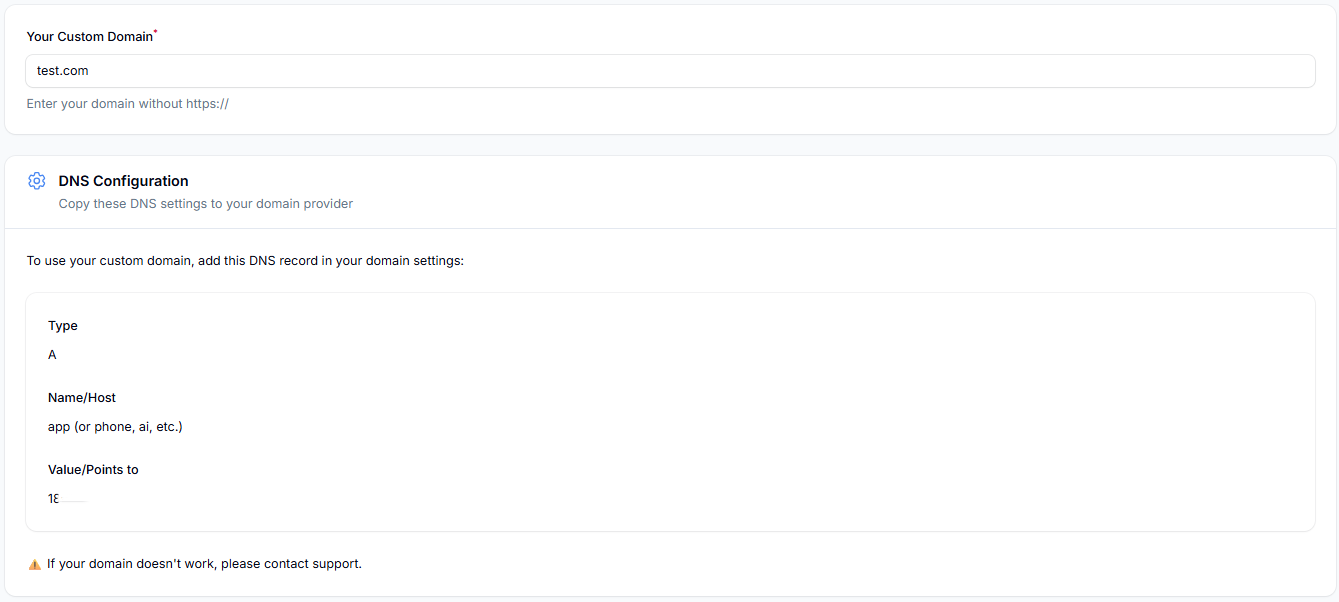 **Domain Configuration:**
* **Custom Domain:** Your branded URL (e.g., app.yourcompany.com, platform.yourcompany.com)
* **SSL Certificate:** Automatic HTTPS setup for security (generated automatically)
* **Subdomain Support:** Use any subdomain (app, platform, ai, phone, etc.)
**DNS Setup Requirements:**
* **Record Type:** A record (not CNAME)
* **Host/Name:** Your chosen subdomain (e.g., app, platform)
* **Value/Points to:** Server IP address (provided in settings)
**Critical SSL Requirements:**
* **Add DNS directly without proxy to make SSL work**
**Troubleshooting Domain Issues:**
* SSL certificates generate automatically when DNS is configured correctly
* If SSL fails, check that nameservers aren't adding proxy on top
* Cloudflare users must disable the proxy feature on the DNS record
* Contact support to regenerate SSL if domain setup doesn't work initially
* Allow 24-48 hours for DNS propagation worldwide
### Colors & Theme Customization
**Domain Configuration:**
* **Custom Domain:** Your branded URL (e.g., app.yourcompany.com, platform.yourcompany.com)
* **SSL Certificate:** Automatic HTTPS setup for security (generated automatically)
* **Subdomain Support:** Use any subdomain (app, platform, ai, phone, etc.)
**DNS Setup Requirements:**
* **Record Type:** A record (not CNAME)
* **Host/Name:** Your chosen subdomain (e.g., app, platform)
* **Value/Points to:** Server IP address (provided in settings)
**Critical SSL Requirements:**
* **Add DNS directly without proxy to make SSL work**
**Troubleshooting Domain Issues:**
* SSL certificates generate automatically when DNS is configured correctly
* If SSL fails, check that nameservers aren't adding proxy on top
* Cloudflare users must disable the proxy feature on the DNS record
* Contact support to regenerate SSL if domain setup doesn't work initially
* Allow 24-48 hours for DNS propagation worldwide
### Colors & Theme Customization
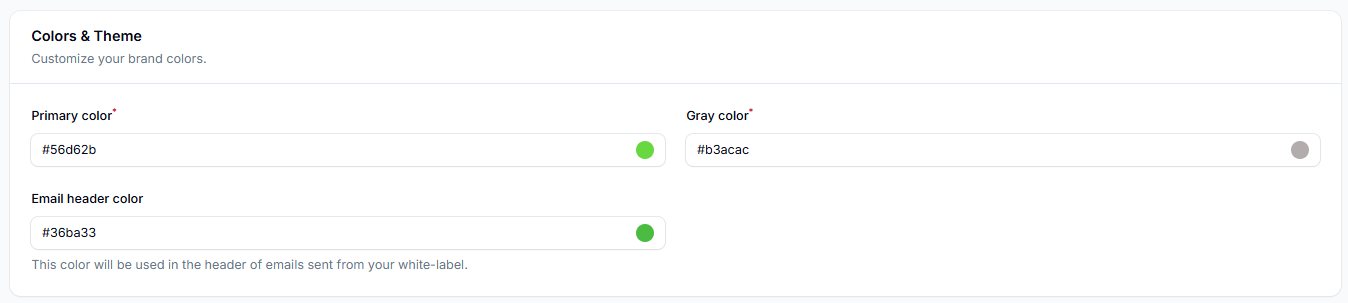 **Color Scheme Configuration:**
* **Primary Color:** Main brand color for buttons, links, and accents (default: #01df4a)
* **Gray Color:** Secondary color for borders, backgrounds, and neutral elements
* **Email Header Color:** Color used in email template headers and footers
**Color Application Areas:**
* Button backgrounds and hover states
* Navigation highlights and active states
* Progress bars and loading indicators
* Form focus states and validation
* Email branding consistency
**Best Practices:**
* Choose colors with sufficient contrast (WCAG 2.1 AA compliance)
* Test colors in both light and dark modes
* Maintain consistency across all interface elements
* Consider colorblind accessibility when selecting schemes
### Website URLs Configuration
**Color Scheme Configuration:**
* **Primary Color:** Main brand color for buttons, links, and accents (default: #01df4a)
* **Gray Color:** Secondary color for borders, backgrounds, and neutral elements
* **Email Header Color:** Color used in email template headers and footers
**Color Application Areas:**
* Button backgrounds and hover states
* Navigation highlights and active states
* Progress bars and loading indicators
* Form focus states and validation
* Email branding consistency
**Best Practices:**
* Choose colors with sufficient contrast (WCAG 2.1 AA compliance)
* Test colors in both light and dark modes
* Maintain consistency across all interface elements
* Consider colorblind accessibility when selecting schemes
### Website URLs Configuration
 **Essential Platform Links:**
* **Terms of Service URL:** Legal terms and conditions page (displayed in registration)
* **Documentation URL:** Custom documentation site link (replaces default docs)
**URL Requirements:**
* Must use HTTPS protocol (https\://)
* Links should point to your own domain
* Terms of Service link appears in user registration
* Documentation URL replaces default help links throughout platform
**Usage Examples:**
* Terms: `https://yourcompany.com/terms-and-conditions`
* Docs: `https://docs.yourcompany.com` or `https://help.yourcompany.com`
### Footer Links Management
**Essential Platform Links:**
* **Terms of Service URL:** Legal terms and conditions page (displayed in registration)
* **Documentation URL:** Custom documentation site link (replaces default docs)
**URL Requirements:**
* Must use HTTPS protocol (https\://)
* Links should point to your own domain
* Terms of Service link appears in user registration
* Documentation URL replaces default help links throughout platform
**Usage Examples:**
* Terms: `https://yourcompany.com/terms-and-conditions`
* Docs: `https://docs.yourcompany.com` or `https://help.yourcompany.com`
### Footer Links Management
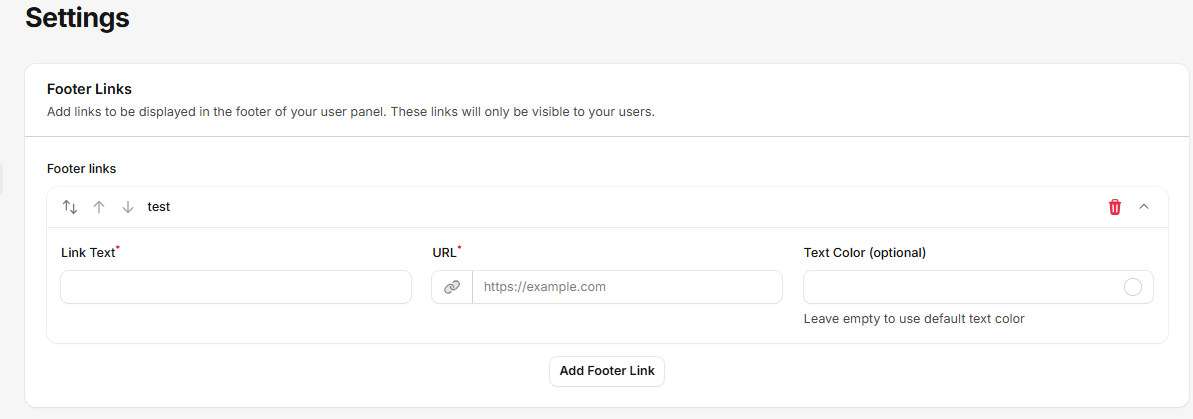 **Custom Footer Links:**
* **Link Text:** Display name (max 50 characters)
* **URL:** Destination link (must be valid URL with https\://)
* **Text Color:** Optional custom color for individual links
**Link Features:**
* Unlimited footer links (recommended: 3-6 links)
* Drag and drop reordering with arrow buttons
* Links only visible to your users (not in tenant admin)
**Common Link Types:**
* Company pages: About Us, Contact, Careers
* Support: Help Center, Documentation, Tutorials
* Legal: Privacy Policy, Terms, Cookie Policy
* Social: LinkedIn, Twitter, Facebook profiles
* Product: Features, Pricing, Case Studies
### Social Login Integration
**Custom Footer Links:**
* **Link Text:** Display name (max 50 characters)
* **URL:** Destination link (must be valid URL with https\://)
* **Text Color:** Optional custom color for individual links
**Link Features:**
* Unlimited footer links (recommended: 3-6 links)
* Drag and drop reordering with arrow buttons
* Links only visible to your users (not in tenant admin)
**Common Link Types:**
* Company pages: About Us, Contact, Careers
* Support: Help Center, Documentation, Tutorials
* Legal: Privacy Policy, Terms, Cookie Policy
* Social: LinkedIn, Twitter, Facebook profiles
* Product: Features, Pricing, Case Studies
### Social Login Integration
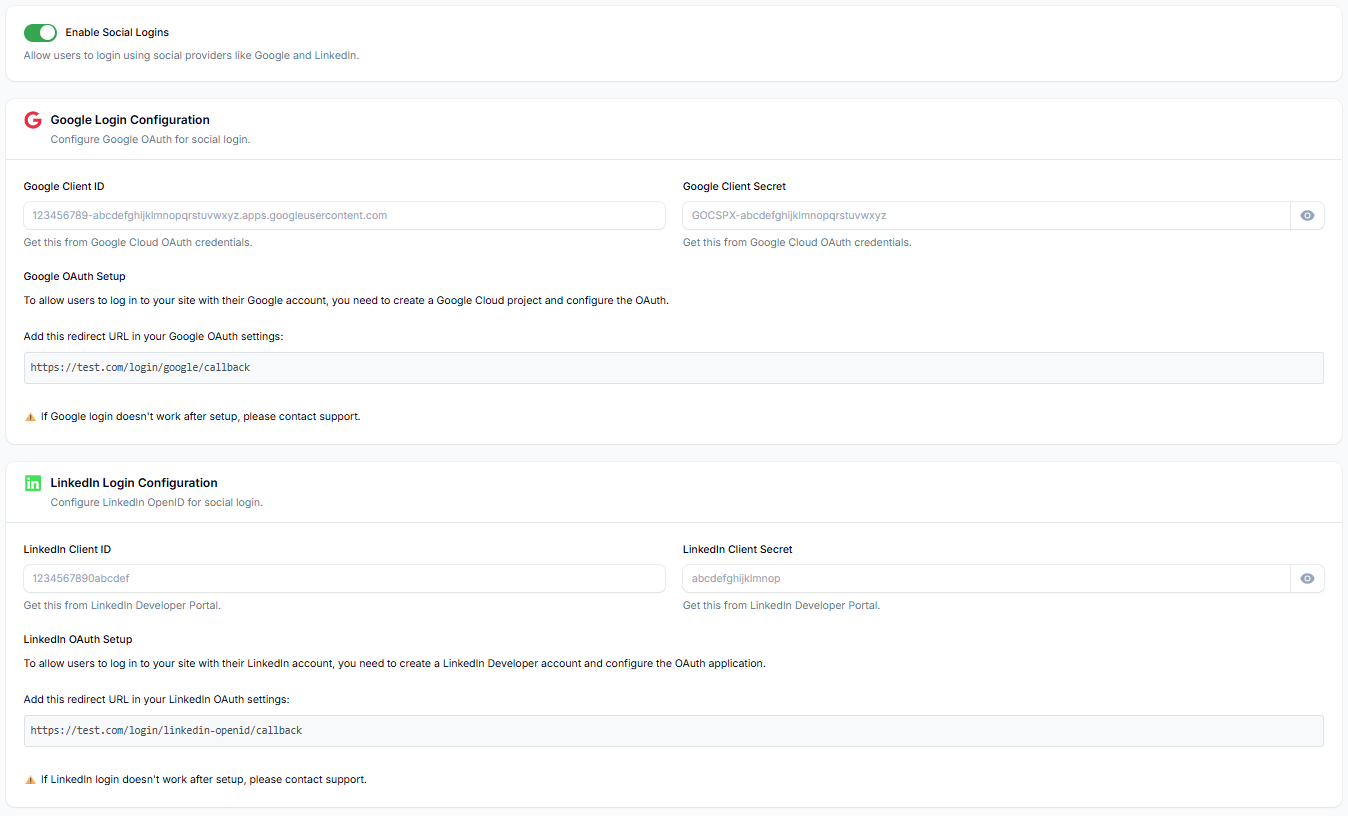 **Social Login Control:**
* **Enable Social Logins:** Master toggle for all social authentication
* **Google OAuth Integration:** Google account sign-in for users
* **LinkedIn OAuth Integration:** LinkedIn professional login option
**Google OAuth Configuration:**
* **Google Client ID:** OAuth application identifier from Google Cloud Console
* **Google Client Secret:** Secret key for authentication (hidden/revealable)
* **Redirect URL:** `https://yourdomain.com/login/google/callback`
* **Required Scopes:** Profile information and email access
**LinkedIn OAuth Configuration:**
* **LinkedIn Client ID:** Application ID from LinkedIn Developer Portal
* **LinkedIn Client Secret:** Secret key for LinkedIn authentication
* **Redirect URL:** `https://yourdomain.com/login/linkedin-openid/callback`
* **OpenID Connect:** Uses LinkedIn's OpenID Connect protocol
**Important Notes:**
* Disabling social logins clears all OAuth credentials
* Contact support if social login fails after setup
* Test with actual accounts before going live
* Users can still create regular accounts even with social login enabled
**Setup Documentation:**
* [Google OAuth Setup Guide](/white-label/social-logins/google)
* [LinkedIn OAuth Setup Guide](/white-label/social-logins/linkedin)
### Email Templates Customization
**Social Login Control:**
* **Enable Social Logins:** Master toggle for all social authentication
* **Google OAuth Integration:** Google account sign-in for users
* **LinkedIn OAuth Integration:** LinkedIn professional login option
**Google OAuth Configuration:**
* **Google Client ID:** OAuth application identifier from Google Cloud Console
* **Google Client Secret:** Secret key for authentication (hidden/revealable)
* **Redirect URL:** `https://yourdomain.com/login/google/callback`
* **Required Scopes:** Profile information and email access
**LinkedIn OAuth Configuration:**
* **LinkedIn Client ID:** Application ID from LinkedIn Developer Portal
* **LinkedIn Client Secret:** Secret key for LinkedIn authentication
* **Redirect URL:** `https://yourdomain.com/login/linkedin-openid/callback`
* **OpenID Connect:** Uses LinkedIn's OpenID Connect protocol
**Important Notes:**
* Disabling social logins clears all OAuth credentials
* Contact support if social login fails after setup
* Test with actual accounts before going live
* Users can still create regular accounts even with social login enabled
**Setup Documentation:**
* [Google OAuth Setup Guide](/white-label/social-logins/google)
* [LinkedIn OAuth Setup Guide](/white-label/social-logins/linkedin)
### Email Templates Customization
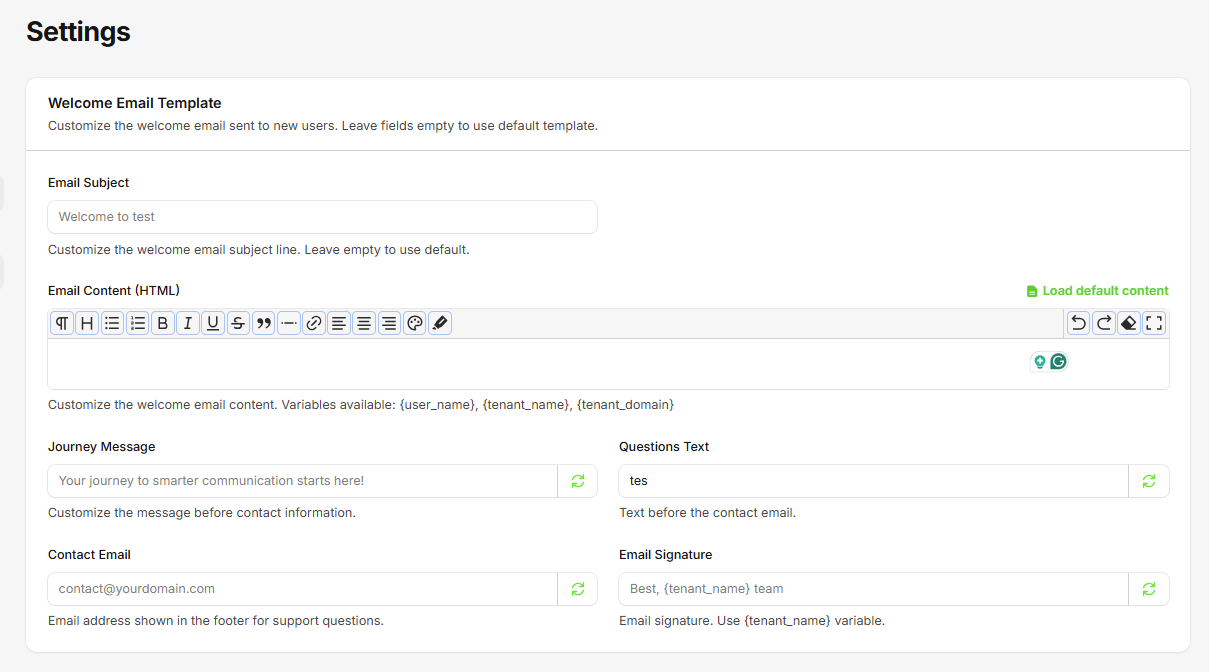 **Welcome Email Configuration:**
* **Email Subject:** Custom subject line for new user welcome emails
* **Email Content (HTML):** Rich text editor for email body content with variables
* **Journey Message:** Text before contact information section
* **Questions Text:** Text before contact email display
* **Contact Email:** Support email address displayed in email footer
* **Email Signature:** Custom signature with tenant name variable
**Available Variables:**
* `{user_name}` - New user's name
* `{tenant_name}` - Your platform name
* `{tenant_domain}` - Your custom domain
**Content Editor Features:**
* Rich text formatting (headings, lists, bold, italic, underline)
* Text alignment and color customization
* Link insertion and blockquotes
* Load default content templates
**Email Branding:**
* Uses email header color from Colors & Theme tab
* Incorporates your platform name and branding
* Professional layout with your contact information
* Responsive design for mobile and desktop
**Testing Templates:**
* Configure SMTP settings first (next section)
* Use the built-in test email feature to preview your template
* Test email shows exactly how your welcome emails will appear to users
### Email SMTP Configuration
**Welcome Email Configuration:**
* **Email Subject:** Custom subject line for new user welcome emails
* **Email Content (HTML):** Rich text editor for email body content with variables
* **Journey Message:** Text before contact information section
* **Questions Text:** Text before contact email display
* **Contact Email:** Support email address displayed in email footer
* **Email Signature:** Custom signature with tenant name variable
**Available Variables:**
* `{user_name}` - New user's name
* `{tenant_name}` - Your platform name
* `{tenant_domain}` - Your custom domain
**Content Editor Features:**
* Rich text formatting (headings, lists, bold, italic, underline)
* Text alignment and color customization
* Link insertion and blockquotes
* Load default content templates
**Email Branding:**
* Uses email header color from Colors & Theme tab
* Incorporates your platform name and branding
* Professional layout with your contact information
* Responsive design for mobile and desktop
**Testing Templates:**
* Configure SMTP settings first (next section)
* Use the built-in test email feature to preview your template
* Test email shows exactly how your welcome emails will appear to users
### Email SMTP Configuration
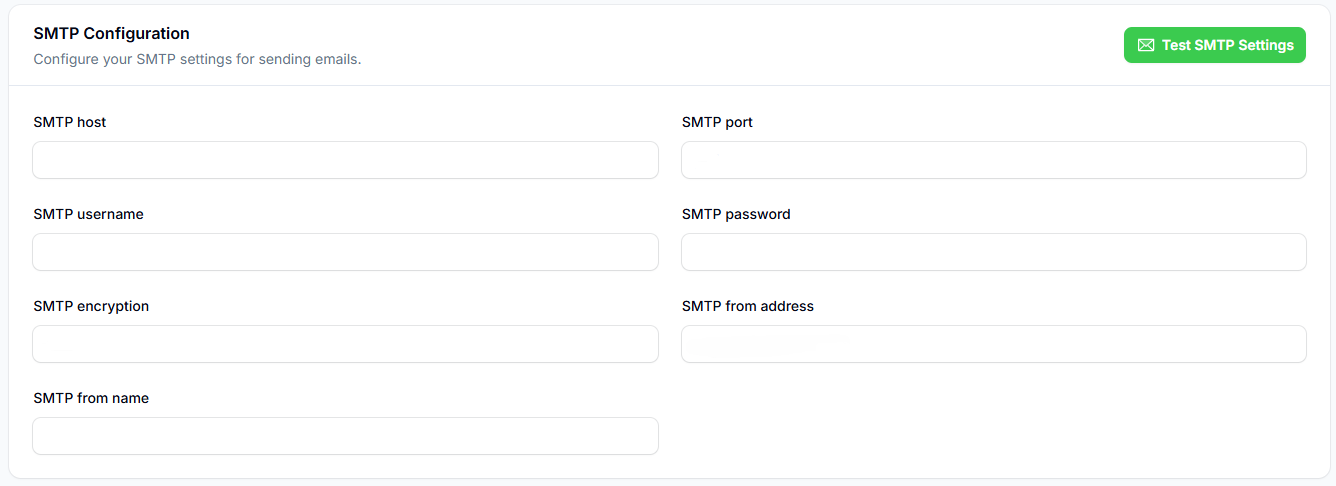 **SMTP Server Settings:**
* **SMTP Host:** Mail server hostname (e.g., smtp.gmail.com, smtp.sendgrid.net)
* **SMTP Port:** Server port number (465 for SSL, 587 for TLS, 25 for unsecured)
* **SMTP Username:** Authentication username (usually your email address)
* **SMTP Password:** Authentication password or app-specific password
* **SMTP Encryption:** Security protocol (e.g. TLS)
* **From Address:** Sender email address (e.g., [no-reply@yourdomain.com](mailto:no-reply@yourdomain.com))
* **From Name:** Display name for outgoing emails (e.g., "YourCompany Platform")
**Email Testing:**
* Built-in SMTP test functionality sends test email to your account
* Verifies all SMTP settings before saving
* Test email includes welcome email preview
* 10-second timeout for connection testing
### Custom Scripts Integration
**SMTP Server Settings:**
* **SMTP Host:** Mail server hostname (e.g., smtp.gmail.com, smtp.sendgrid.net)
* **SMTP Port:** Server port number (465 for SSL, 587 for TLS, 25 for unsecured)
* **SMTP Username:** Authentication username (usually your email address)
* **SMTP Password:** Authentication password or app-specific password
* **SMTP Encryption:** Security protocol (e.g. TLS)
* **From Address:** Sender email address (e.g., [no-reply@yourdomain.com](mailto:no-reply@yourdomain.com))
* **From Name:** Display name for outgoing emails (e.g., "YourCompany Platform")
**Email Testing:**
* Built-in SMTP test functionality sends test email to your account
* Verifies all SMTP settings before saving
* Test email includes welcome email preview
* 10-second timeout for connection testing
### Custom Scripts Integration
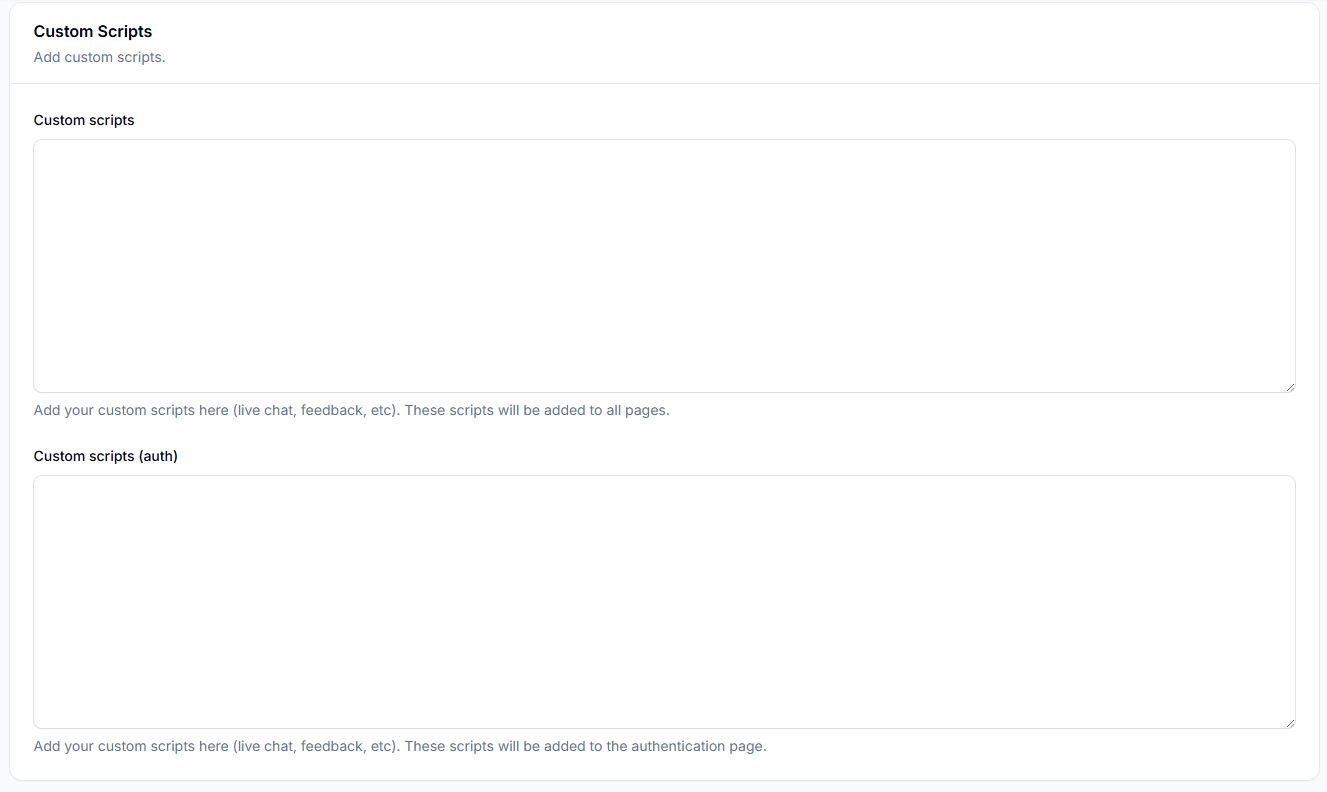 **Available Script Fields:**
* **Custom Scripts:** Add your custom scripts here (live chat, feedback, etc). These scripts will be added to all pages.
* **Custom Scripts (Auth):** Add your custom scripts here (live chat, feedback, etc). These scripts will be added to the authentication page.
**Common Use Cases:**
* Live chat widgets (Intercom, Zendesk Chat)
* Analytics tracking (Google Analytics, Facebook Pixel)
* Feedback tools and customer support widgets
* Custom styling or functionality
### Custom Appearance Controls
**Available Script Fields:**
* **Custom Scripts:** Add your custom scripts here (live chat, feedback, etc). These scripts will be added to all pages.
* **Custom Scripts (Auth):** Add your custom scripts here (live chat, feedback, etc). These scripts will be added to the authentication page.
**Common Use Cases:**
* Live chat widgets (Intercom, Zendesk Chat)
* Analytics tracking (Google Analytics, Facebook Pixel)
* Feedback tools and customer support widgets
* Custom styling or functionality
### Custom Appearance Controls
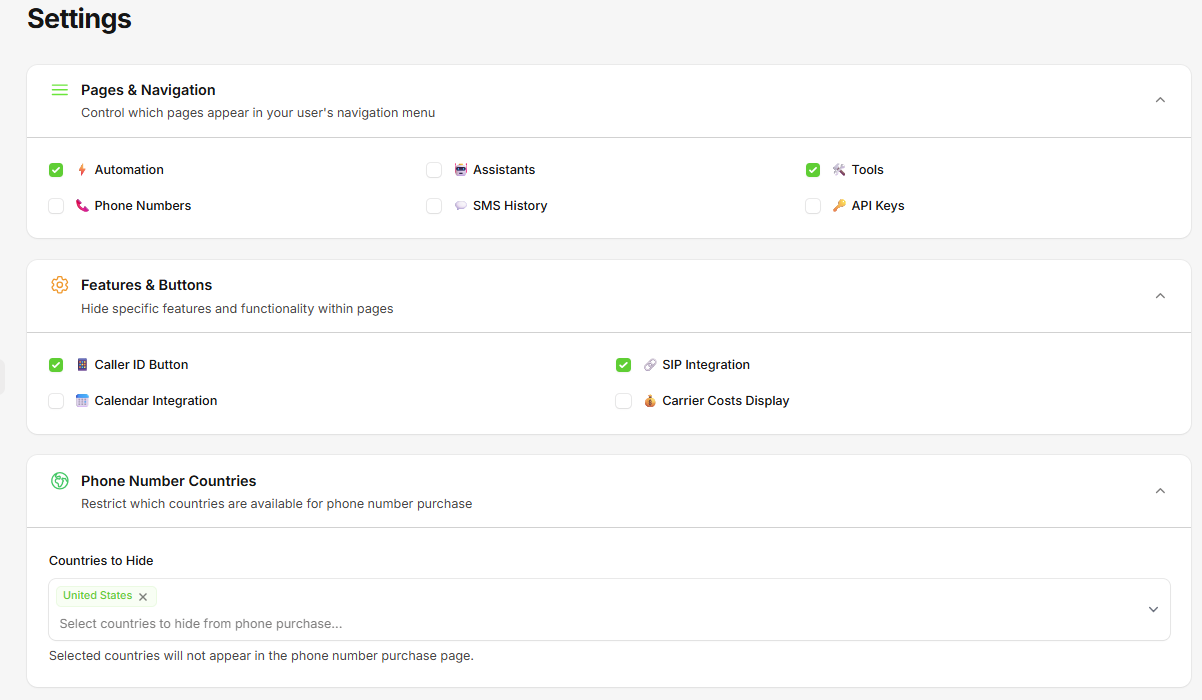 **Pages & Navigation Control:**
Hide entire sections from user navigation:
* **⚡ Automation:** Hide automation/workflow page
* **🤖 Assistants:** Hide AI assistants management page
* **🛠️ Tools:** Hide tools and integrations page
* **📞 Phone Numbers:** Hide phone number management page
* **💬 SMS History:** Hide SMS messaging history page
* **🔑 API Keys:** Hide API documentation and keys page
**Features & Buttons Control:**\
Hide specific functionality within pages:
* **📱 Caller ID Button:** Hide caller ID configuration option
* **🔗 SIP Integration:** Hide SIP trunking integration button
* **📅 Calendar Integration:** Hide calendar booking features
* **💰 Carrier Costs Display:** Hide call cost information from users
**Phone Number Countries:**
* **Country Restrictions:** Select countries to hide from phone number purchase
* **Available Countries:** US, Canada, Australia, UK, South Africa, Romania, Italy, Puerto Rico, Denmark, Israel, Poland, Finland, Netherlands, Spain
* **Search & Multi-select:** Easy country selection with search functionality
* **Purchase Control:** Hidden countries won't appear in phone number purchase flow
**Use Cases:**
* **Simplified Interface:** Remove unused features for cleaner user experience
* **Regional Restrictions:** Hide phone number countries not relevant to your market
* **Feature Limitations:** Control access to premium features based on user plans
* **Compliance Requirements:** Hide features not available in certain jurisdictions
## 4. Set Up Billing
1. Click your user profile
2. Select "Billing platform"
**Pages & Navigation Control:**
Hide entire sections from user navigation:
* **⚡ Automation:** Hide automation/workflow page
* **🤖 Assistants:** Hide AI assistants management page
* **🛠️ Tools:** Hide tools and integrations page
* **📞 Phone Numbers:** Hide phone number management page
* **💬 SMS History:** Hide SMS messaging history page
* **🔑 API Keys:** Hide API documentation and keys page
**Features & Buttons Control:**\
Hide specific functionality within pages:
* **📱 Caller ID Button:** Hide caller ID configuration option
* **🔗 SIP Integration:** Hide SIP trunking integration button
* **📅 Calendar Integration:** Hide calendar booking features
* **💰 Carrier Costs Display:** Hide call cost information from users
**Phone Number Countries:**
* **Country Restrictions:** Select countries to hide from phone number purchase
* **Available Countries:** US, Canada, Australia, UK, South Africa, Romania, Italy, Puerto Rico, Denmark, Israel, Poland, Finland, Netherlands, Spain
* **Search & Multi-select:** Easy country selection with search functionality
* **Purchase Control:** Hidden countries won't appear in phone number purchase flow
**Use Cases:**
* **Simplified Interface:** Remove unused features for cleaner user experience
* **Regional Restrictions:** Hide phone number countries not relevant to your market
* **Feature Limitations:** Control access to premium features based on user plans
* **Compliance Requirements:** Hide features not available in certain jurisdictions
## 4. Set Up Billing
1. Click your user profile
2. Select "Billing platform"
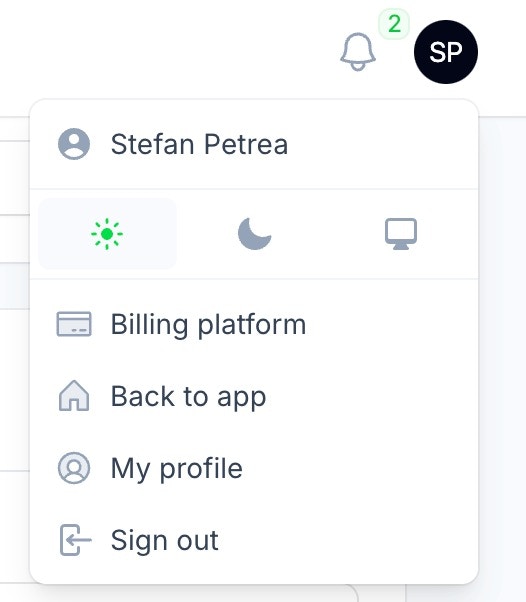 3. Connect your Stripe account to start collecting payments
4. Configure payment settings
## 5. Domain Configuration
1. Choose your domain (e.g., app.yourbrand.com)
2. Add the provided DNS records to your domain
3. Wait for SSL certificate provisioning
4. Test domain access
## 6. Testing
Before launch:
1. Create a test account
2. Verify all branding elements
3. Test the signup process
4. Make test calls
5. Verify billing flow
## Next Steps
* [Configure your pricing plans](/white-label/plans-setup)
* Set up your support channels
* Prepare your marketing materials
***
**Need help?** Contact our support team for assistance with any step of the setup process.
3. Connect your Stripe account to start collecting payments
4. Configure payment settings
## 5. Domain Configuration
1. Choose your domain (e.g., app.yourbrand.com)
2. Add the provided DNS records to your domain
3. Wait for SSL certificate provisioning
4. Test domain access
## 6. Testing
Before launch:
1. Create a test account
2. Verify all branding elements
3. Test the signup process
4. Make test calls
5. Verify billing flow
## Next Steps
* [Configure your pricing plans](/white-label/plans-setup)
* Set up your support channels
* Prepare your marketing materials
***
**Need help?** Contact our support team for assistance with any step of the setup process.